Business Rules
Use this function to automate tasks, such as modifying the ITSM records or creating a new record based on action details when trigger conditions are met. This reduces the manual effort of creating and updating records for repeatable actions.
Business rules can be set to run at the time when any Add or Edit actions occurs.
In the main window, click Admin > Others > Business Rules. The Business Rules window displays.

![]()
| 1. | From the Select Actions drop-down list, choose an New Business Rule. |
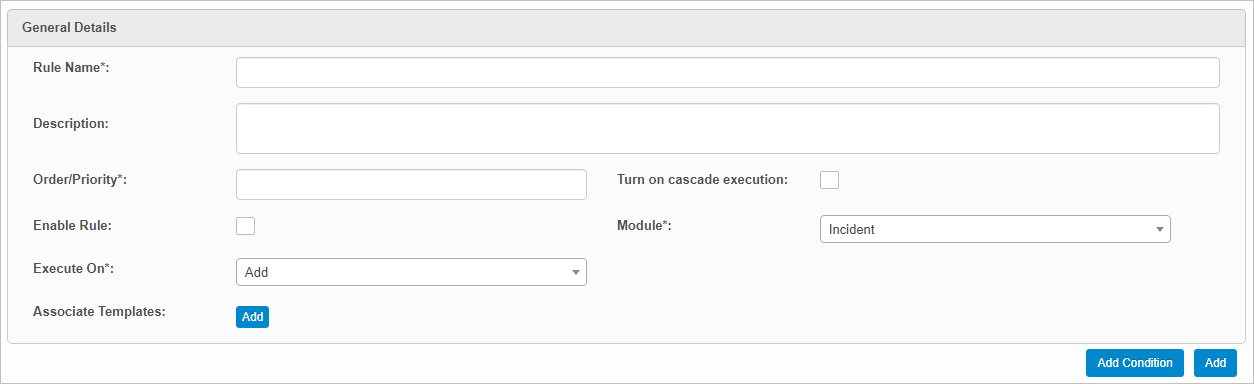
| 2. | Complete the fields referring to the table below. |
| 3. | When all selections/entries are made, click Add. |
Business Rules Fields
| Field | Description |
|---|---|
| Rule Name | Name for this rule. |
| Description | Description for this rule. |
| Order/Priority | The order in which this rule should be executed when there are multiple rules set for the selected module. Must be a numeric value. |
|
Module |
Name of this module for which the rule applies. Click the drop-down list and select an available module, such as Incidents, CMDB, and so forth. |
|
Turn on cascade execution |
Enable this option to execute the next enabled business rule based on the Order/Priority for the same module. |
|
Enable rule |
Specifies if the rule is enabled or disabled. |
|
Execute On |
Specifies on what action the rule is executed. |
|
Associated Blueprints |
Click the plus + sign and select the Blueprint(s) to associate with this business rule. |
After a business rule has been added, the trigger conditions are added. Two or more conditions can be combined using “AND” or “OR” logical conditions.
| 1. | Open an existing business rule. |
| 2. | Move to the Trigger Conditions Details section. |

| 3. | To ignore the conditions, select Ignore Conditions. |
| 4. | Select the Property and Operator. Then enter the applicable value. |
| 5. | Perform any of the actions below for additional conditions. |
| 6. | When all selections/entries are made, click Save. |
Add/Delete Condition Block
Apply AND Condition
To insert an AND condition:
| 1. | Click the plus + sign icon. |
| 2. | Enter the condition details. |
| 3. | Add more AND conditions, as required. |
| 4. | If there are no more conditions to add, click Save. |
Apply OR condition
To insert an OR condition:
| 1. | Click the paperclip icon. |
| 2. | Include more OR conditions, as required. |
| 3. | If there are no more conditions to add, click Save. |
Delete Single Condition
| 1. | Locate the condition to delete. |
| 2. | Click the red x icon. |
| 3. | At the confirmation prompt, click Continue. |
After a business rule has been added, the action details are added.
| 1. | Open an existing business rule. |
| 2. | Move to the Action Details section. |
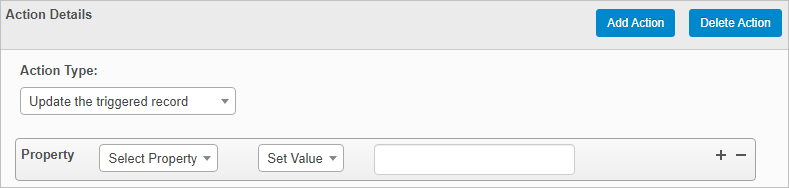
| 3. | In the Action Type field, click the drop-down list and select the action to perform, such as updating the triggered record. |
| 4. | Select the Property and Operator. Then enter the applicable value. |
| 5. | Perform any of the actions below for additional conditions. |
| 6. | When all selections/entries are made, click Save. |
Add/Delete Action Details
Add/Delete Action Details Block
| 1. | To add a user notification when a rule is triggered, click Add. |
| 2. | In the Send Report To dialog box, search for a select the applicable users, groups, roles, and/or departments. |
| 3. | Click Save. |
| 4. | To delete a notification, click the X next to the name (of the user, groups and so forth). |
| Not all functions include an option to edit record line items shown in the main window. |
| 1. | Navigate to the window containing the record to edit. |
| 2. | Click the line containing the record. The applicable window or dialog box displays. |
| 3. | Make the necessary modifications. |
| 4. | Click Save or Add, as applicable. |
| Deleting is a permanent action and cannot be undone. Deleting may affect other functionality and information in the application such as data in configured reports, fields in windows, selectable options, etc. Therefore, be sure to understand the potential effects before making a deletion. |
| 1. | Click the line that contains the item to delete. |
| 2. | From the Select Actions drop-down list, choose Delete. If a confirmation message is displayed, take the appropriate action (for example, click OK or Continue). |
Other Functions and Page Elements