Remote Install
Use this function to install an agent remotely on a client. To determine if an agent already exists on a client, check the agents tab of the Host Name or IP Address of the host are present.
| |
Ensure the client State is set to "true." Otherwise, the remote Discovery Agent cannot be installed. Also, the installation of an agent removes the old agent and installs the new agent on the host. |
|
1.
|
In the main window, click Admin > Discovery > Client. |
|
2.
|
Select the applicable client. A new window opens with the Details tab displayed. |
|
3.
|
Click the Discovery Agents tab. |
|
4.
|
From the Select Actions drop-down list, choose Remote Install. The Remote Discovery Agent Install dialog box displays. |
| |
By default, the Application IP address displays. This information cannot be edited.
|
|
5.
|
In the Scan through field, select the radio button for either IP Address or Host Name. |
If IP Address is selected, in the Agent IP field, type the IP address onto which the agent is installed.
If Host Name is selected, in the Host Names field, type the Host Name.
|
6.
|
If the IP Address or Host Name already exists, click the check box for Re-Install if exist. |
|
7.
|
Click Schedule and Install to specify the time the installation should occur. The Bulk Schedule Scan dialog box displays (see below). A folder in the following path will be created on the machine: C:\Program Files\Virima Discovery Application\tools\agent |
|
8.
|
Click Install to begin the installation. |
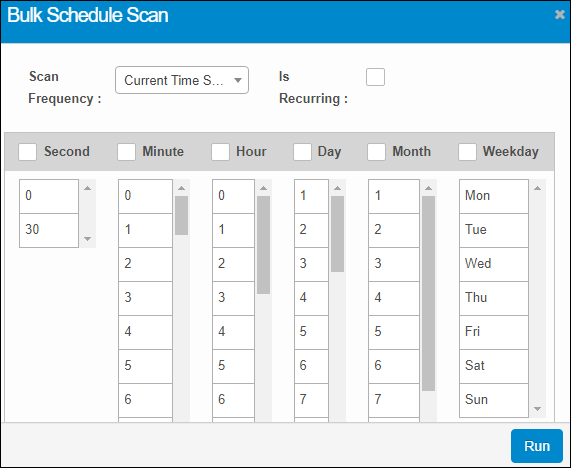
Bulk Schedule Scan Dialog Box
|
1.
|
From the Scan Frequency drop-down list, select the required frequency for the scan.
|
|
2.
|
To repeat the scan at the frequency selected, select Is Recurring. |
|
3.
|
Select the Time (Second, Minute, Hour) and Date (Day, Month, Weekday) for the scan to occur. |
Related Topics
Client
